_edited.jpg)
Template Design Guide
Regular Monitoring
(Please note that the steps below are specific to EMIS web, however, each GP system will be equipped with similar functionality)
1) Choose Configuration and then Template Manager

2) Select add a new Folder

3) Once folder is created then right click and select new template

4) Name the folder and the template

5) Double click Clinical Code on left of the page
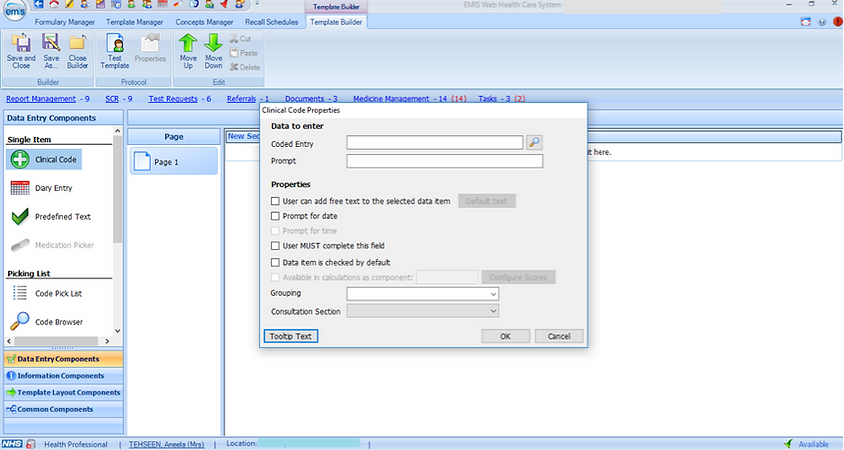
6) A new window will appear and it requests you to enter a coded entry.
(please remember this is auditable information so be specific) Example: For Lithium monitoring template you may want to add Lithium Monitoring by GP, for Sulfasalzine monitoring template you may want to select Rheumatology Drug monitoring-Sulfasalazine. You only need to look for the description and not the Codes, unless you know the exact code ID.

7) Now choose the Prompt.
Here you add the question that will appear for the user of the Clinical code above. You are free to choose a question that most appropriately described the Clinical code.

8) Select options and save (Repeat from step 4 for each clinical code)
You may tick the option of free text. You also can have predefined text here.
Select the option if this is mandatory for the user to fill. Remember if you check mandatory field, your user will be unable to save a template unless one fills this information. This has both pros and cons. Advantage being that if a documentation of INR is essential for Warfarin then unless this is filled in the template can’t be saved. On the contrary if this particular information is difficult to fill your user may navigate away from the template altogether. (Screen shots available under step 11)
Choose Consultation Section by clicking on the drop down menu. You have a choice of Problem, Assessment, Examination, Family history, Procedure, Result, Social, Additional , Test request and Comment. This helps structure the final draft of a saved template so choose wisely.

9) From the left section you may choose a Code Pick list.
This is useful to help provide a list of pre-coded answer for your question. Example Prompt → Smoking status, Code pick list →Current smoker, Ex-Smoker, Stopped Smoking, Rolls own cigarettes, Cigar smoker, passive smoker, not a passive smoker etc. Do not forget to assign your code pick list to appropriate section of consultation as point No.8


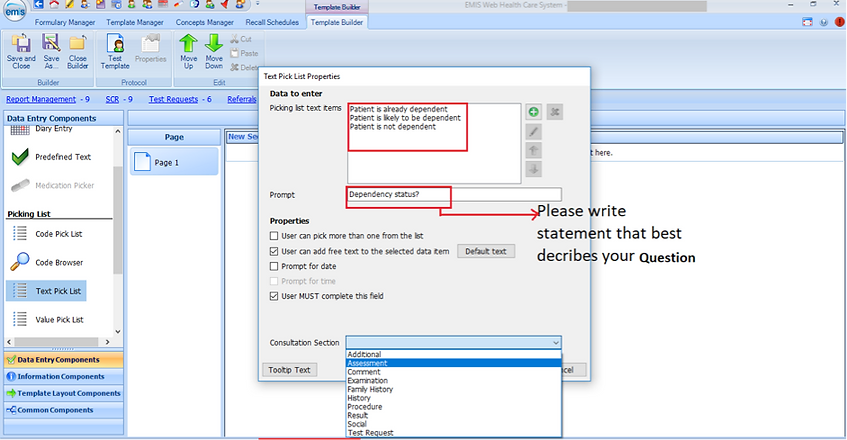
10) From the left section you may choose text pick list.
This is useful if your question/answers are not available on code library. Example Prompt → Agreement of care plan, Text pick list →Patient agrees to continue with the same dose, A reduction in dose agreed, One off issue, Further supply subject to review etc. Do not forget to assign your text pick list to an appropriate section of consultation as point No. 8

11) From the left section of template building page now choose diary entry prompt.
This can be a review date or date for the next Blood test.

Enabling/Activating template
1) Right-click on the template you want to enable. Now choose properties as shown below

2) Within properties, there are two options; “Details” and “Triggers”.
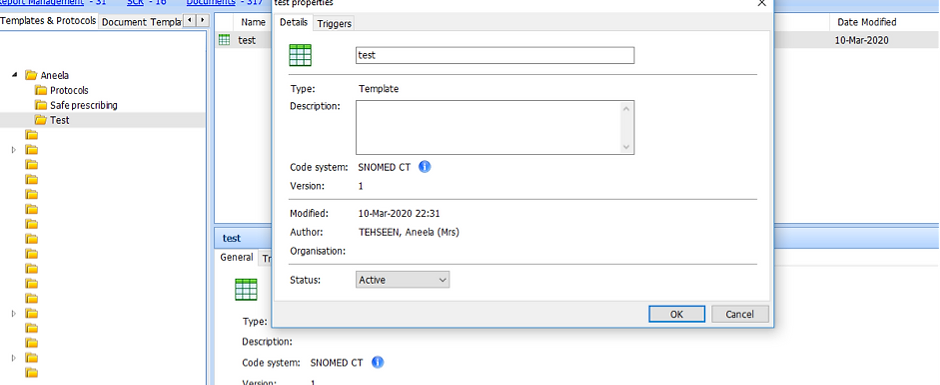
Choose “trigger” and then “Add”

3) This provides an option of system trigger

There are several options under system trigger. If your template is for a certain drug/drug class category, this is the place to link it to the template. For example if the template is meant to run when a drug is prescribed for the first time, choose “Add a drug”.


4) Now choose if you would like template as a prompt (giving user a choice to run it) or auto-run etc.

5) Now assign appropriate job categories to the template
It’s better to link a safer prescribing template to those individuals who can prescribe. These templates are available for manual run by all job roles within consultation section e.g. HCA, Phlebotomist, pharmacy technician, non prescribing nurse/pharmacist etc.

6) You may repeat the system trigger with another option such as “issue a drug”.
This would mean that the template will be active at not only first time prescribing of that drug but will also get triggered when it is prescribed again from the current medication list. (Please note any medication requests made via workflow do not trigger the template)

7) Once you have agreed with the clinical team that the practice is ready to accept the template(s), set the status to “Active”.
Remember you may change it to draft or inactive during the time of reviewing of template.
